This is for reference. If you love how you clean and you are a great cleaner, you don’t need to read this. This is great to read if you wish to learn different ideas.
Anything not in the Maintenance Caddy is a Special Project which requires Special Scheduling.
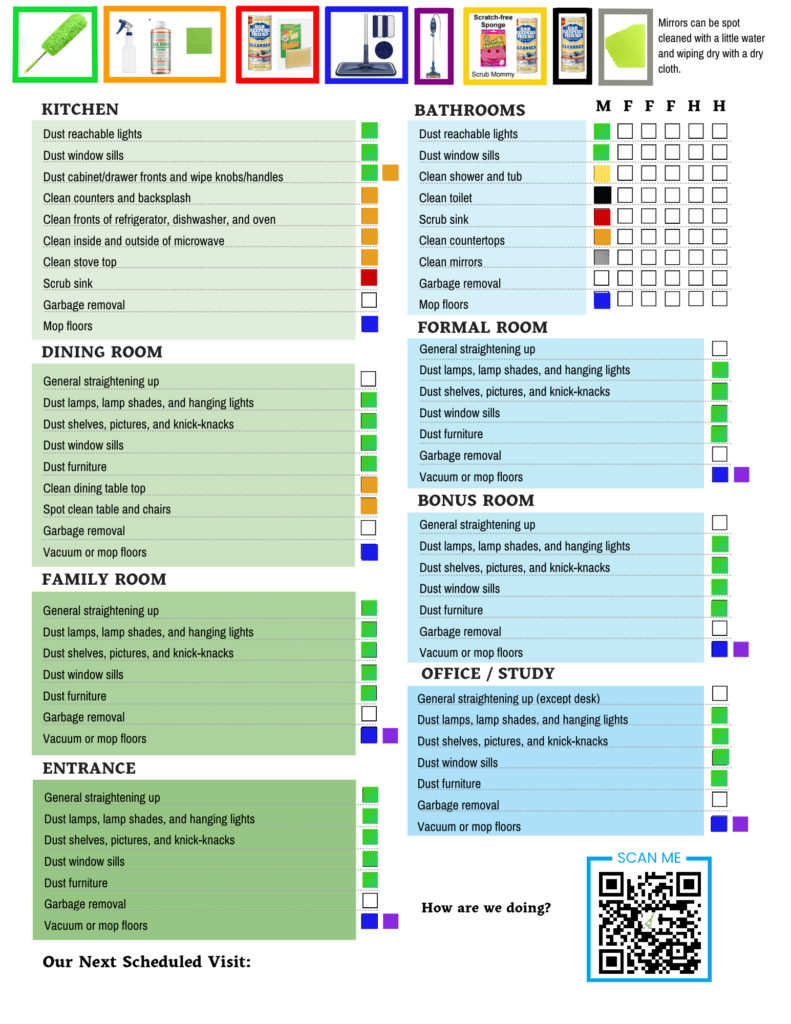
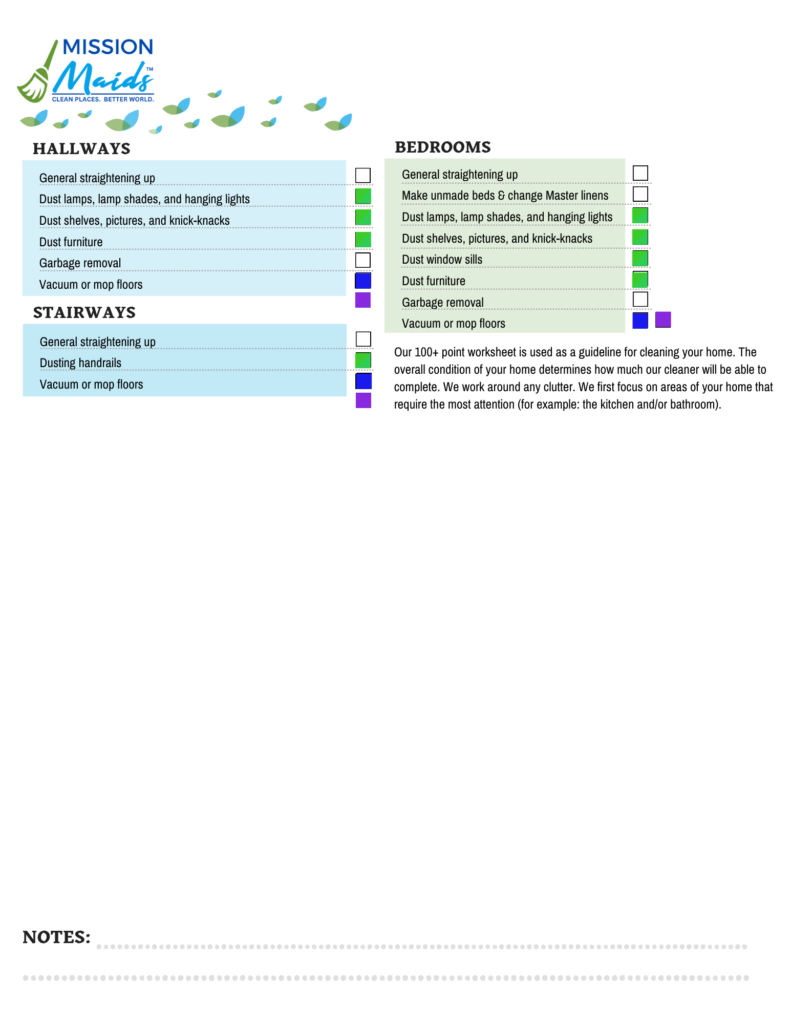
Color Coded Cleaning Worksheet
Match the color of the cleaning supplies with the color of the box to see the recommended tool for each item on the worksheet.
Prepare
- Caddy
- Apron
- All-Purpose Cleaner (Sal Suds)
- We highly recommend Sal Suds because it’s safe on everything (stainless steel, granite, stone, etc.) You won’t have to worry whether your cleaner will harm sensitive surfaces like granite or stainless steel. Trust us!
- Bar Keepers Friend
- Eraser Daddy by Scrub Daddy
- Scrub Mommy
- Dobie Sponge
- 10 Microfiber cloths
- Duster
- 1 32 oz bottle of Cleaner solution
- 32 oz of water. Put water in first.
- 1 Tablespoon of Sal Suds
- 1/4 tsp. of essential oil (optional) for scent
- Citrus, lavender, lemon, orange, peppermint are all great
- 1 32 oz bottle of Degreaser
- 32 oz of water. Put water in first.
- 4 Tablespoons of Sal Suds
- Squeegee
- Large plastic cup
- 2 pair of Nitrile gloves
- A few trash bags (2 gallons)
- Can of Lysol for disinfecting sponges between homes
- Toilet paper roll (This is for cleaning toilets if customer does not have toilet paper. Otherwise you will use theirs.)
- Broom Brush (use to sweep away debris from walls and corners and sides of steps). This will save you so much time and energy!
- Spray and wipe from back to front
- Pick up items towards the back, wipe them and wipe under them, and place them back. Work from back to front.
- When moving items on the counter, move straight forward far enough to get behind them.
- Before you place the item back, wipe it down or dust it. Then put it back exactly where it goes.
- Dust or wipe drawer front drawer tops as you come to them. Check drawer handles and knobs for fingerprints.
- When cloths get too wet, place them inside a liner or grocery bag inside your apron.
- Be in the habit of placing the sprayer back in the loops of your apron, not on the kitchen counter. It may seem awkward at first, but it is faster and easier.
- For stuck-on gunk:
- 1st, try wiping with a little extra general purpose cleaner
- 2nd, try using the white scrubbing pad/magic eraser with some extra general purpose cleaner. Once finished, place the scrubbing pad/magic eraser back in its spot exactly where it should always go — back in the ziplock bag in your apron
Sequence
We recommend breaking up the cleaning into 4 Phases:
- Kitchen except floors
- Bathrooms. Bathrooms are only rooms where it’s faster/easier to hand-wipe your way out after cleaning the toilet outside than using a mop.
- Dusting back to front
- Floors back to front and out the door
Team of 1
- Kitchen (except floors) then double-check using Worksheet while checking off items
- Bathrooms then double-check using Worksheet while checking off items
- Dusting Back to Front then double-check using Worksheet while checking off items
- Floors Back to Front
- Vacuum then mop
- Complete the tasks on the worksheet and leave worksheet
Team of 2
- Make Beds together
- Check behind each other’s work nicely at the end
Technician 1 (Bath and Duster)
- Baths
- Dust Back to Front
- Broom Brush in back pocket. Use to swipe any debris you see away from corners and walls to make it faster and easier for the vacuuming
- Duster in hand
- Fill out worksheet to leave
- You are double checking for you and the other Technician when you fill it out
Technician 2 (Kitchen and Floors)
- Kitchen
- Plug vacuum in central point of home with an extension cord (if necessary) so you can vacuum the whole home without unplugging and replugging which takes more time and effort
- Vacuum Back to Front
- Check the other technician’s work (mainly bathrooms)
- Mop Back to Front and out the door
Team of 1
- Kitchen (except floors) then double-check using Worksheet while checking off items
- Bathrooms 1st Floor then double-check using Worksheet while checking off items
- Bathrooms 2nd Floor then double-check using Worksheet while checking off items
- Dusting Top Floor Back to Front then double-check using Worksheet while checking off items
- Floors Top Floor Back to Front
- Vacuum then mop
- Stairs:
- Vacuum or Mop Steps and Dust handrails as you go down
- Dusting Bottom Floor Back to Front then double-check using Worksheet while checking off items
- Floors Bottom Floor Back to Front and out the door
- Vacuum then mop
- Complete the tasks on the worksheet and leave worksheet
Team of 2
- Make Beds together 1st floor then 2nd floor
Technician 1 (Bath and Duster)
- Bathrooms 2nd Floor then double-check using Worksheet while checking off items
- 2nd Floor Dusting Back to Front
- Broom Brush in back pocket. Use to swipe any debris you see away from corners and walls to make it faster and easier for the vacuuming
- Duster in hand
- Stairs:
- Dust handrails as you go down
- Bathrooms 1st Floor then double-check using Worksheet while checking off items
- 1st Floor Dusting Back to Front
- Broom Brush in back pocket. Use to swipe any debris you see away from corners and walls to make it faster and easier for the vacuuming
- Duster in hand
- Fill out worksheet to leave
- You are double checking for you and the other Technician when you fill it out
Technician 2 (Kitchen and Floors)
- Kitchen
- 2nd Floor: Plug vacuum in central point of home with an extension cord (if necessary) so you can vacuum the whole home without unplugging and replugging which takes more time and effort
- Check the other technician’s work (mainly bathrooms) on 2nd Floor
- Vacuum / Mop Back to Front
- Stairs:
- Vacuum or mop as you go down.
- Always be below the vacuum and be careful not to fall back!
- Check the other technician’s work (mainly bathrooms) on 1st Floor
- Vacuum Back to Front
- Mop Back to Front and out the door
Kitchen
Apron set-up
- 3-5 folded Microfiber cloths (Cloth)
- Fold in 4 x 4 squares before using. This is like making 8 smaller cloths out of each one!
- 1 Eraser Daddy (Eraser)
- 1 Scrub Mommy
- 1 Dobie Sponge
- 1 Spray Bottle with Cleaner
- 1 Spray Bottle with Degreaser on other side
Prepare
- Duster in back pocket
- Put on gloves
- Caddy to the right of Sink
- Place rugs near the entryway and place trash can outside kitchen
- Start to the right of the sink
- You will use 2 cleaning cloths at a time — 1 damp and 1 dry. As one gets too damp, replace it with the one you were using that was drier. Then replace the one that was drier with a fresh cloth.
- Remove and discard all opened food and drinks, wrappers, food boxes, and trash that attract rodents, ants, bugs, or mold.
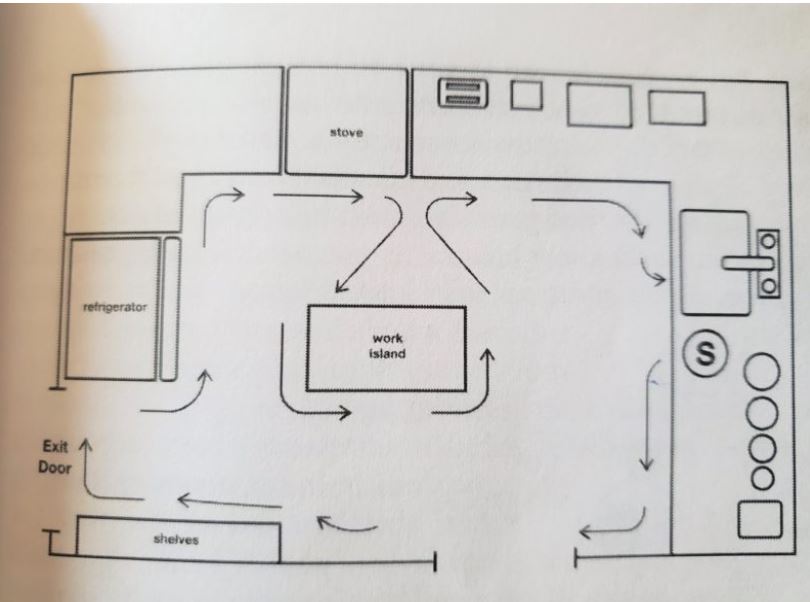
- The S in the picture below is the Starting Point.
- IMPORTANT:
- Clean from Top to Bottom, Back to Front as you move Left to Right around the Kitchen
- Below is how you will clean but you will be working your way from Top to Bottom, Back to Front as you move Left to Right around the Kitchen
- DUST (with Duster):
- Cabinet fronts, Range Hood (degreasing is a deep clean), Lampshades, Lights, Light Fixtures, Shelves, Pictures, Knick-knacks, Furniture, Top of Refrigerator, Canisters, racks, food processor, etc.
- FULL WIPE CLEAN (Spray on Surface)
- Countertops
- Stove Top
- Cloth, cleaner, sponge
- Cloth and cleaner
- Outside and Inside Microwave
- Cloth and cleaner
- Outside the Countertop Appliances (Toaster, Coffee Maker, Blender, etc.)
- Cloth and cleaner
- SPOT CLEAN (Spray on Cloth and not surface):
- Outside of appliances including refrigerator, Stove knobs, cabinet knobs and handles
- Cloth and cleaner
- Stainless steel: (with Cloth and Cleaner):
- Cloth and cleaner
- No streaks
- If you don’t have these, use Hot Water and clean Microfiber cloth or sponge. Better than a chemical that will streak it.
- Then wipe WITH grain with dry microfiber.
- Outside of appliances including refrigerator, Stove knobs, cabinet knobs and handles
- SINK:
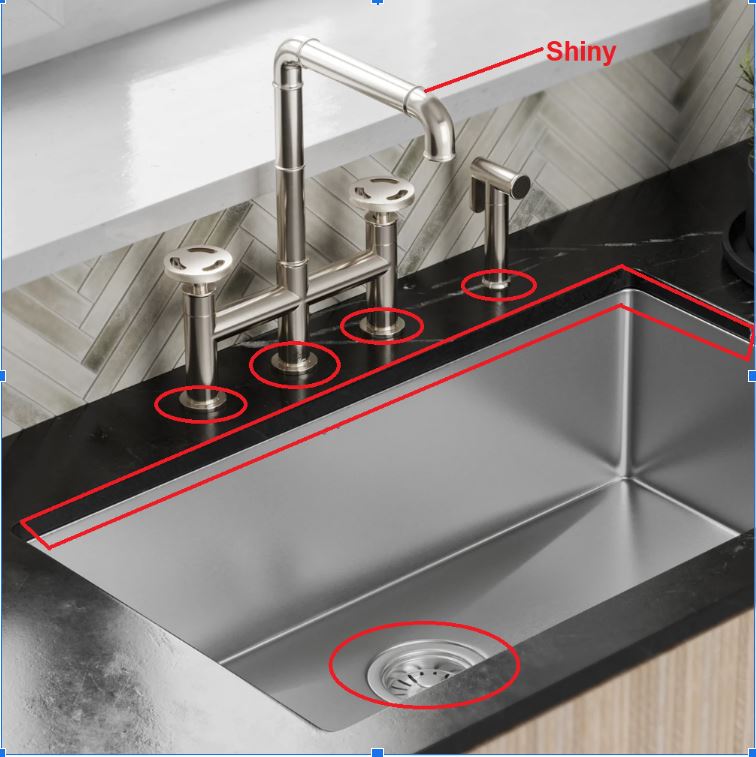
- Where Faucets Meet Counter
- Use edge of sponge and cleaner
- Bowl
- Barkeeper’s friend and sponge
- Rinse and dry
- Where Faucets Meet Counter
- FAUCETS
- Buff with dry cloth til shiny
- GARBAGE REMOVAL
APPLIANCES (large)
- Spot Clean with Cloth and cleaner
- Stainless Steel:
- No streaks
- If you don’t have these, use Hot Water and clean Microfiber cloth or sponge. Better than a chemical that will streak it.
- Then wipe WITH grain with dry microfiber.
- Top of Refrigerator:
- Duster
- Cloth and Cleaner if necessary
- Air Vent of Refrigerator at bottom:
- Broom brush
APPLIANCES (countertop appliances like Toaster, Coffee maker, Blender, etc.)
- Full Wipe Clean of outside with Cleaner
- If that doesn’t work, degreaser and cloth or sponge
- Be sure to pick up and spray the counter underneath
CABINETS
- Spray cleaner on 1 side of the folded microfiber cloth (4×4 square). Never spray directly on the cabinets.
- Duster the front and wipe the knobs and handles with moistened cloth
CANISTERS, RACKS, FOOD PROCESSORS, ETC.
- Duster
COUNTERTOPS
- Full Wipe Clean
- Spray and wipe from back to front
- Pick up items towards the back, wipe them and wipe under them, and place them back. Work from back to front.
- When moving items on the counter, move straight forward far enough to get behind them.
- Before you place the item back, wipe it down or dust it. Then put it back exactly where it goes.
- Dust or wipe drawer front drawer tops as you come to them. Check drawer handles and knobs for fingerprints.
- When cloths get too wet, place them inside a liner or grocery bag inside your apron.
- Be in the habit of placing the sprayer back in the loops of your apron, not on the kitchen counter. It may seem awkward at first, but it is faster and easier.
- For stuck-on gunk:
- 1st, try wiping with Degreaser
- 2nd, try using the Eraser Daddy with some extra Degreaser. Once finished, place the Eraser Daddy back in its spot exactly where it should always go — back in the ziplock bag in your apron
MICROWAVE
- Cloth and cleaner inside and outside
OVERHEAD LIGHTS, LIGHT FIXTURES, AND LAMPSHADES
- Duster
PICTURE FRAMES, SHELVES, OTHER FURNITURE
- Duster
RANGE HOOD
- Duster
- Degrease if ordered the Quarterly Deep Clean
- Do not clean vent filters
SINK
- Around the base of faucets, use cleaner and edge of sponge
- Where sink and counter meet (around the sink and above the sink basin), use cleaner and sponge
- Sink basin/bowl, sprinkle a little Bar Keeper’s Friend (just a little!), spread around bowl with sponge and rinse
SINK FAUCETS
- Buff with dry microfiber cloth
- Usually won’t need cleaner
STOVETOP (Electric)
- 1st, try spraying with Cleaner and then wipe with cloth
- For a tougher job, spray with use sponge
- For an even tougher job, spray with Degreaser and use sponge
STOVETOP (Gas)
- Take grates from the left side and place them on top of the right grates.
- Spray and wipe the left side as necessary.
- Use the Eraser for tough areas.
- After cleaning the left side, wipe and replace the left grates.
- Then move the right grates to the counter just to the right of the stove.
- Now clean the middle and right sides of the stovetop.
- Clean the grates and return them to the right side of the stovetop.
STOVE FRONT
- Cloth and cleaner
- Spray knobs with cleaner and wipe with cloth or sponge
- Clean smell
- Clean floors
- Clean, streak-free stainless steel appliances
- Top of the refrigerator
- Around the inside of the refrigerator door including the gasket. This is where you should stop inside the refrigerator. Anything more inside is an Extra and falls under the Inside the Refrigerator cleaning
- Clean countertops
- Clean microwave
- Clean stove top
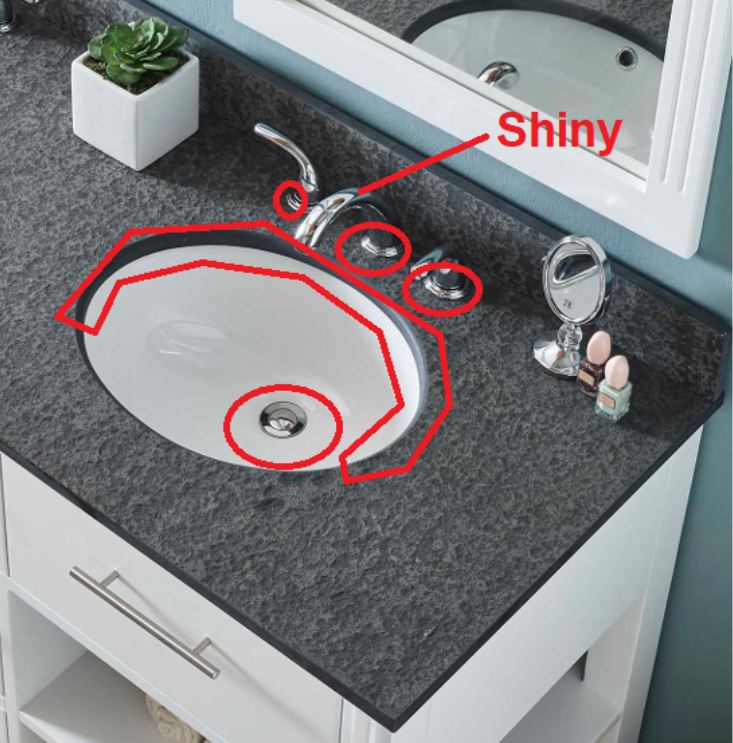
- Where the faucets meet the counter (see pic below)
- Sparkling faucets (buff with dry microfiber) (see pic below)
- Where the sink meets the counter (see pic below)
- The drain (see pic below)
-
Bathroom
Apron set-up
- 3-5 folded Microfiber cloths (Cloth)
- Fold in 4 x 4 squares before using. This is like making 8 smaller cloths out of each one!
- 1 Eraser Daddy (Eraser)
- 1 Scrub Mommy
- 1 Dobie Sponge
- 1 Spray Bottle with Cleaner
Prepare
- Put on Nitrile gloves (optional but recommended)
- Caddy to the right of shower on floor
- Place rugs near the entryway and place trash can outside kitchen
- Place Caddy outside Shower
- Place rugs near the entryway and place trash can outside bathroom
- Start with Shower
- You will typically be actively using 2 cleaning cloths at a time. One more damp and one more dry. As one gets too damp, replace it with the one you were using that was drier. Then replace the one that was drier with a fresh cloth.
- 2 Trips around the Bathroom
- 1st Trip: Wet work (Shower, Tub, Sink, Toilet)
- 2nd Trip: Drier work (Counters, mirrors, dusting)
- DUST (with Duster):
- Cabinet fronts, Light Fixture
- CLEAN
- Tubs, Showers, Toilets
- WIPE CLEAN (with Cleaner):
- Countertop, cabinet knobs
- MIRRORS:
- Use clean, damp microfiber cloth from water
- Wipe with DRY microfiber cloth
- No streaks. Look from an angle.
- SINK:
- Where Faucets Meet Counter
- Use edge of sponge and cleaner
- Bowl
- Barkeeper’s friend and sponge
- Rinse and dry
- Where Faucets Meet Counter
- FAUCETS
- Buff with dry cloth til shiny
- GARBAGE REMOVAL
Clean in following order:
1st Trip
SHOWER (not acrylic)
- Cleaner and Cloth if spot-clean or rarely used shower
- Bar Keeper’s Friend and Sponge, Brush most of the time especially Master Bath
- If Acrylic shower, dry
- If not Acrylic, no need to dry
SHOWER (acrylic)
- Cleaner and Cloth if spot-clean or rarely used
- Bar Keeper’s Friend and Sponge, Brush if needed
- Rinse and dry with Microfiber
- Place Shower Brush in sink
SHOWER HEADS, FAUCETS, FIXTURES
- Cleaner and Cloth if spot-clean or rarely used shower
- Bar Keeper’s Friend and Sponge, Shower Brush most of the time especially Master Bath
SHOWER DOOR INSIDE
- Cleaner and Squeegee if you can
- Otherwise, Bar Keeper’s Friend and Sponge (scratch-free!)
SHOWER DOOR FRAME
- If not that dirty: Cleaner and Cloth
- If dirty: Bar Keepers Friend, sponge, brush
SHOWER RUNNERS
- Cleaner and Sponges
TUBS
- If clean-looking, wipe with Cloth and buff the faucets with dry microfiber
- Cleaner and Microfiber if you can
- If Cleaner and Cloth won’t be enough, Bar Keepers Friend, sponge, brush and then rinse. Buff faucets with dry microfiber
SHOWER AND TUB COMBO
- Cleaner and Cloth
- Bar Keepers Friend and Sponge, Brush if needed
- Rinse and dry with Cloth
- Place Shower Brush in sink
SINK BOWL
- Shower Brush with Cleaner on it
- Scrub around with brush
TOILET BOWL
- Sprinkle a little of Bar Keeper’s Friend inside
- Use toilet brush to clean around inside
TOILET OUTSIDE
- Cleaner and Toilet Paper
FLOOR AROUND TOILET
- Cleaner with Toilet Paper
2nd Trip
MIRRORS
- Bathroom mirrors are the only room of the home where we wipe down the entire mirror every cleaning
- Use an S motion starting at the upper right. Don’t use circles. It takes longer.
- You can use a clean, damp with water cloth and then follow-up with a clean, dry cloth
- Make sure you dry so no streaks!
LAMPSHADES, LIGHT FIXTURES, SHELVES, PICTURES, KNICK-KNACKS, FURNITURE
- Duster
TOWEL RACK
- Buff dry with dry cloth
- Make sure to clean where towel rack meets the wall
MEDICINE CABINET TOP AND SIDES
- Cleaner and cloth
SHOWER DOOR EXTERIOR AND HANDLES
- Spot clean with wet cloth and squeegee
- Dry buff the handles
COUNTERTOP
- Cleaner and cloth
SINK FAUCET AND BASE OF FAUCET
- Cleaner and sponge
- Buff faucet with dry cloth
HOTEL FOLD ON TOILET PAPER
- Fold triangle at end
- Clean smell
- Clean floors especially behind the door!
- Clean soap dishes inside shower
- Clean, streak-free mirror
- Clean toilets
- Clean, streak-free shower door
- Clean shower runners / track
- Bottles wiped down and arranged back nicely
- Hotel fold for toilet paper (the triangle)
- Clean countertops
- Where the faucets meet the counter (see pic below)
- Sparkling faucets (buff with dry microfiber) (see pic below)
- Where the sink meets the counter (see pic below)
- The drain (see pic below)
-
Other Rooms
Apron set-up
- 2 folded Microfiber cloths (Cloth)
- Fold in 4 x 4 squares before using. This is like making 8 smaller cloths out of each one!
- 1 Spray Bottle with Cleaner
Prepare
- Your apron with the items above and a Duster in your hand is all you need
- Work Front to Back, Top to Bottom, Left to Right as you work toward the front door (or door that you leave from)
Bedrooms
- GENERAL STRAIGHTENING UP
- DUST:
- Lamp Shades, Light Fixtures, Shelves, Pictures, Knick-Knacks, Furniture
- SPOT-CLEAN:
- Mirrors
- BEDS:
- Make Bed if Needed, Change Sheets if Sheets Left On Bed
Family / Living / Formal Rooms
- GENERAL STRAIGHTENING UP
- DUST:
- Lamp Shades, Light Fixtures, Shelves, Pictures, Knick-Knacks, Furniture
- SPOT-CLEAN:
- Mirrors
Dining Room
- GENERAL STRAIGHTENING UP
- DUST:
- Lamp Shades, Light Fixtures, Shelves, Pictures, Knick-Knacks, Furniture
- TABLE AND CHAIRS:
- Microfiber sprayed with lightly with all-purpose cleaner
- SPOT-CLEAN:
- Mirrors
Office
- DUST:
- Lamp Shades, Light Fixtures, Shelves, Pictures, Knick-Knacks, Furniture
Entrances and Stairways
- DUST:
- Lamp Shades, Light Fixtures, Shelves, Pictures, Knick-Knacks, Furniture
- SPOT CLEAN:
- Glass and Storm Doors
- Mirrors
Hallways
- DUST:
- Lamp Shades, Light Fixtures, Shelves, Pictures, Knick-Knacks, Furniture
- SPOT-CLEAN:
- Mirrors
DINING ROOM:
- Clean overhead light if NOT delicate! Can gently wipe with microfiber the bulbs and light fixture if you are careful.
FRONT AND BACK ENTRANCE:
Spot-free glass door including storm door
- You can get away with spot cleaning these to make sure there are no smudges
Floors
Prepare
- Consider long extension cord
- Plug vacuum into center point of home so you don’t have to unplug in every room. This saves time and makes your job easier!
- The idea is to plug in the vacuum only once per floor
- No apron
- Just whisk broom in backpocket
- Vacuum from Back to Front
- Then Mop Back to Front, one story at a time
Hard Floors
- Fill mop cartridge with water and add 1/2 cap of Sal Suds
- Recommended: Also add 1-2 drops of essential oil
- Shake cartridge
- Vacuum then mop
Carpets
- Use Broom Brush for areas that you normally would use a vacuum attachment. This saves so much time! Much faster and easier to grab your Broom Brush from your back pocket than use attachments
Extras
- Items Needed:
- Duster
- Degreaser (Sal Suds in water)
- Microfiber cloth
- White pad
- Vacuum attachment
- Baseboard brush
- While you are vacuuming, dust the baseboards accordingly.
- Use the Duster as 1st choice
- If greasy, spray with Degreaser and wipe with microfiber
- If scuff marks, spray and then use a wet white pad to lightly remove the scuff marks
- If pet hair, use baseboard brush or Vacuum attachment
Video reference:
- Items Needed:
- Duster
- All-Purpose Cleaner (Sal Suds in water)
- Microfiber cloth
- White pad
- Use the Duster as 1st choice
- If greasy, spray with Degreaser and wipe with microfiber
- If scuff marks, spray and then use a wet white pad to lightly remove the scuff marks
ITEMS NEEDED:
- Rubber Coated Gloves
- ANDANDA Level 5 Cut Resistant Gloves, Nitrile Sandy Finish Coated Work Gloves with Power Grip
- Sprayer bottle with water
- Black and Decker Orbital buffer
- BLACK+DECKER Polisher, 6 inch, 2 Handle Grip, Swappable Wool or Foam Bonnets, 10-foot Chord for Easy Mobility
- Brite & Clean Hard Water Stain Removal kit
- Brite & Clean Ultimate Hard Water Stain Remover, 6 Ounce (Pack of 1)
- Microfiber cloth
- Glass Polishing cloth
STEPS:
- Don your rubber coated gloves
- Do the following steps one area or wall at a time
- Spray area with water – damp not wet.
- Rinse and squeeze out the orbital buffer pad in the sink and place onto head of orbital buffer.
- Sprinkle Brite & Clean on top of pad which is now on the buffer and smear it around some creating a bit of a paste
- Start in upper right corner of door/wall/area and guide the buffer in a zig-zag pattern (right to left, left to right) down the glass / wall / area.
- If the door / wall / area is too wide for your comfort, break it into vertical sections
- NOTE: If a shower door, you will need to use one hand on the frame to keep the door steady as you work the buffer with the other hand
- NOTE: Be careful not to apply too much pressure to break the glass!
- Stop every once in a while to spray your pad and sprinkle more of the Brite & Clean on before continuing
- If any marks are left on the glass when you’re done:
- On a wet microfiber cloth, wrap it around your fingers, and pour a little bit of Brite & Clean on there
- Go in a circular motion with pressure over the areas that did not come clean the first time
- Go back over area with dry cloth, preferably a Brite Wipes cloth or glass cleaning cloth
VIDEO REFERENCE:
- Starts at correct time of the instruction
FIRST AID MEASURES:
- If you inhale it, get to fresh air
- If it gets on your skin, rinse with water
- If it gets in your eyes, rinse with water
- If you swallow it, rinse your mouth with water and drink plenty of water
- Accidental release: Wipe it up
ITEMS NEEDED:
- Microfiber cloths
- All-purpose cleaner (Sal Suds preferred)
- Large Towel
STEPS:
- Empty contents of cupboard, cabinet, or drawer on a bath towel (to avoid scratching floor or countertop)
- Wipe down inside of cupboard, cabinet, or drawer to remove crumbs and gunk
- Wipe down contents of the cabinet, cupboard, or drawer
- Stack items neatly back inside
IMPORTANT: Do NOT use Hot Water on Glass shelves or Glass parts or any of the fragile, sensitive parts because they can crack!
- Items Needed:
- A large cooler
- Towels (2-3)
- Food-safe All-purpose cleaner (Sal Suds or Dish soap)
- Baking soda
- 5 microfiber cloths
- Paper towel
- Toothbrush
- Scratch-free sponge
- Gloves (optional but handy)
- Place trash can nearby
- Spread a towel on counter.
Freezer Cleaning Part 1 of 2 - Remove all the food from your freezer and place it in your cooler with the ice.
- Unplug your refrigerator. Don’t worry about the food inside the fridge. The U.S. Food and Drug Administration (FDA) states that food will stay cold for about four hours without power if you don’t open the refrigerator door. This chore shouldn’t take you more than an hour. Just make sure people aren’t going in and out of the fridge as you work.
- Remove bins, drawers, trays and place on towel. NOTE: You will clean these last because they need to come to room temperator to avoid any cracking! You will do the refrigerator before you get back to this part of the freezer.
- Spray the inside of the freezer generously with your cleaner and wipe the solution away with a dry microfiber cloth. You may need to repeat this step a few times to get your freezer clean.
- For stubborn spills or food gunk, dip the old toothbrush in hot water. Scrub gently until the area is clean and wipe any residue away with a microfiber cloth.
- Wipe the inside of your freezer dry with a clean microfiber cloth, making sure you don’t leave any liquid behind.
Refrigerator Cleaning - Take everything out and place on the towels on counter and separate with a space. Each space on the counter represents a shelf in the refrigerator. For example, left to right on counter means top to bottom in frig.
- Take some photos of inside of refrigerator so you will know where the parts go back!
- Remove baskets, bins, and shelves. SLOWLY AND CAREFULLY!
- With paper towel, wipe any chunks out and dispose in trash can.
- Pretreat inside with all-purpose cleaner
- Pretreat baskets, bins and shelves with all-purpose cleaner and baking soda.
- Go back to inside refrigerator. Starting on the Left, working Top to Bottom, spray again with all-purpose cleaner and wipe with microfiber cloth. Use toothbrush for any grooves particularly in crisper drawers and shelf areas.
- Spray gaskets around doors and seals around edges and inside hinges with cleaner and scrub with toothbrush.
- Once inside done, go to sink and take your non-scratch sponge. Lather it up with some water and sal suds. NOT HOT WATER since it could break glass. Use Warm water and clean each large part.
- Rinse and dry well with a clean dry microfiber cloth. Clean well so you don’t have excess moisture going back in the frig.
- Replace cleaned large item one at a time. Use your photos if you don’t know!
- BE VERY CAREFUL especially with glass shelves. Take your time! These parts are expensive to replace.
- Take photos of your work and upload to My Drive in your app
- Once done, replace each item in its original area, wiping at the bottoms of each item.
Freezer Cleaning Part 2 of 2 - Under the sink, use your dish sponge to wash the freezer accessories that are now close to room temperature. Wash just like you would hand wash dishes.
- Rinse ice trays, bins and drawers under the faucet until all soapy residue has been removed.
- Wipe items dry using a microfiber cloth before returning them to the freezer. This step is important, as leftover drops of water can form beads of ice that could affect the functionality of your freezer accessories. The exception, of course, is ice trays, which can be refilled before they’re placed back in the freezer.
- Take photos of your work and upload to My Drive in your app
- Plug your freezer back in and replace your food. If the ice in your cooler has started to melt, wipe any liquid off of food items before returning them to the freezer.
- Look at the refrigerator, smile, and give a big thumbs up and say, “Yes!”
- Be proud of your work!
Video reference:
NOTE: If Self-Cleaning oven, this should have been run the night before. If not and you think this will last longer than 30 minutes, let office know. The Customer will need the Special Project “Icky Inside Oven” which is scheduled at a different time.
SUPPLIES:
- Oven Cleaner
- Scrub Mommy Sponge or Terry Cloths
- Paper Towels
- Gloves
- Face Mask recommended
- Bib Apron recommended to protect clothing
STEPS:
- Put on your PPE:
- Gloves
- Face Mask
- Bib Apron
- Remove the oven racks and clean them with Scrub Mommy Sponge
- Apply oven cleaner to the inside of the oven and let it sit for the recommended time on the label
- Wipe the gunk off the ceiling, walls, and floor of the oven with a paper towel and discard
- Scrub the insides of the oven with wet Scrub Mommy Sponge to remove any remaining residue
- Rinse the oven. Remove all the soap and oven cleaner residue with a wet sponge or damp terry cloth
- Wipe down the inside of the freezer with an all-purpose cleaner and sponge or damp terry cloth
- Items Needed:
- Broom Brush
- Vacuum cleaner with brush attachment
- Vacuum upholstered furniture using vacuum attachment as the first resort
- A broom brush that you keep in your back pocket is useful for crevices the vacuum can’t reach
- Make sure you remove and replace any cushions while vacuuming